![]() vendredi 1 mai 2026, 05:36 UTC+2
vendredi 1 mai 2026, 05:36 UTC+2
Vous n’êtes pas connecté.
 NAS Forum »
 MvixBox WDN-2000 (Planex MZK-NAS02SG, Edimax NS-2502 NAS, Digitus DN-7024) »
 OpenWRT port for MvixBOX and Clones »

- 1
- 2

build an actual Open WRT for a myDitto NAS
Now I wondered if I could built an actual openWRT 19.07 firmware by myself. I found some step by steps forexample here: https://dflund.se/~triad/krad/gemini/, but after cloning the repository on it and trying to do the menuconfig it looked more complex then expected. Additionally the targets that are mentioned on the open gemini blog are not in any more or never have been in?
Does anyone have further links on what is necessary to built in and what not? What is the difference in configuration between the devices using the same chip, but having different openWRT.bin files?
I hope you have some links or hints how to do it.
EDIT: I already found out how to see which packages are inside of the running openWRT build. via ssh: opkg list-installed, or very obvious inside of the openWRT webfront end under system/software/actions/installed packagesSo it seems I am mainly interested in how to brew something that runs without problems on the special hardware(the OS related things).
EDIT2: I have another question. The myDitto Manual says, that the maximum possible drive size is 2GB. Is that related to the firmware or a hardware limit. The reason is I would like to install 2x 4GB drives inside.I would appreciate your help.
Another thing due to no one answers at all, Aquar you mentioned somewhere you had contact to the opengemini guy. Did you ever get sources from him, or do you have a contact, because I would like to compare the old source tree and files with the actual one, if possible.
Ce message a été modifié 3 fois. Dernière modification effectuée par "hendi060" (27 janvier 2020, 12:45)
 . If it is to confuse, please tell me(if there is interested anyone at all). My goal is to have at least for me a thread to follow if I ever want to do that kind of things again, apart from what the final result is. I decided to put different themes in different posts to keep some kind of overview. So this is the main part like a Content overview.
By now I have things to tell about:
1. My Hardware, I dismantled the whole thing and did pictures and got information from internet.
2. Things I got to know about some internals, how to connect to the serial port, which kind of adapter, JTAG interface and so on
3. How to configure the firmware and what is to take care of.
Maybe this ends suddenly because I get the mood, that everything is senseless on that old hardware, but at the moment I am motivated. So let us see.
I f anyone has statements please tell me. The best thing would of cause be someone could guide me through the building process, because the hardware is not any longer or never have been supported directly as a target in OpenWRT.
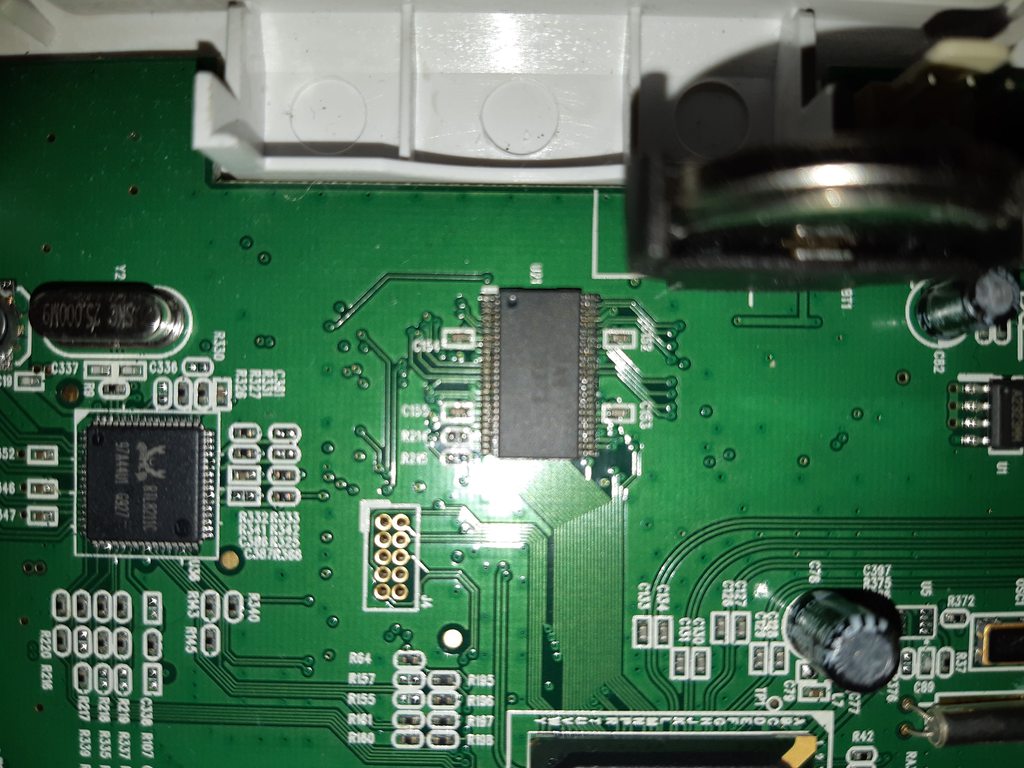
My Hardware

That is the main board.


Backside with flash.


Additional Plate, Adapter for HDD connection and Buttons, LEDs and so on.


Ce message a été modifié 1 fois. Dernière modification effectuée par "hendi060" (29 février 2020, 01:06)
sorry, somehow I did did not get an email due to your post. It does not only from inside look like your hardware I guess.
I did not write here for a long time because I wanted to come along with some REAL results, but it goes quite slow.
I tried to get the guy from open gemini, but he never answered. I did in the meantime manage to get open wrt via git, what was easy, and compile a target, what did some problems with downloading and compiling the toolchain. Maybe I should have downloaded all first, before compiling, but in the end it somehow worked. There is no target in the menucofig for Mvixbox or Myditto or anything that opengemini had online. I think there never was, this guy did his own thing. Unfortunately this means I cannot understand what he did change or patch, because the only thing I found was the file system, what is quite unspectacular. So the work this guy did is in general great and gave a lot of information, but is as far as I understood not useful o build an actual firmware with new kernel.
After reading a lot of open wrt firmware docs, that are not always actual and also sometimes pointing to lede, what has been open wrt in between, I found patches from Linus Walleij, a swedish gu working on patches and hacking around these kind of storlink/cortina gemini chips. I wrote him an email and this guy answered right away, GREAT. He pointed me to the fact that I need a device tree file, which is some kind of abstract but concrete description of all hardware inside of the box. It is the way of linux to keep the kernel quite universal and load hardware information during runtime, what I read it is also possible to load a different device tree during runtime. I am working on that now, I think with the same hardware it should also work for your box. UnfortunateleyI did not here of device trees before so the syntax is quite new and ever information has to be verified. Luckily Linus gave me a Link to the device tree of NAS 4220 what has the same chip and can be used as reference, but still there are things I do not reallly understand. We will see, when I have a working result I give you a feedback.
What do you mean with bootloader screen? The options? It is very similar to what I read over the internet, but I could not see a "brand" like red boot. Here is what I wrote down:
|
|
Code source |
1 2 3 4 5 6 7 8 9 10 11 12 13 14 15 16 17 18 19 20 21 22 23 24 25 26 27 28 29 30 31 32 33 34 35 36 37 38 39 40 41 42 43 44 45 46 47 48 |
Boot Menu (8M+128M version 1.4) ============================================================================== 0: Reboot 1: Start the Kernel Code 2: List Image 3: Delete Image 4: Create New Image 5: Enter Command Line Interface 6: Set IP Address 7: Set MAC Address 8: Show Configuration F: Create Default FIS X: Upgrade Boot Y: Upgrade Kernel Z: Upgrade Firmware A: Upgrade Application R: Upgrade RAM Disk => Select: 0: Neustarten der Kiste/Restart 1: weiter booten in das bestehende System auf dem Flash/ boot into the working operating system on the flash 2: Flash Partitionen anzeigen/ show flash partitions 3: Partitionen löschen/ delete partitions 4: neue Partition erstellen/ create a new partition 5: Start der BOOT-Konsole: Commands: arp ........ Display ARP table config ..... Display System Configuration dm ......... Display (hex dump) a range of memory. exit ....... Exit. go ......... Execute code at a location load ....... Load code mem ........ Display memory information ping ....... Ping host by IP address. quit ....... Exit. sm ......... Write data to specified location. stat ....... Statistics. tftp ....... Get remote file by TFTP. timer ...... timer. 6: IP setzen/set IP 7: MAC setzen/set MAC 8: das zeigen/ show that--> Processor: SL3516c3 CPU Rate: 300000000 AHB Bus Clock:150MHz Ratio:2/1 MAC 1 Address: 00:50:C2:11:11:11 MAC 2 Address: 00:50:C2:22:22:22 inet addr: 192.168.0.200/255.255.255.0 F: Standard Partitionen anlegen/ create default partitions X: Bootloader ersetzen/replace bootloader Y: Kernel ersetzen/replace kernel Z: nach Erfahrungen Anderer überschreibt das alles/according to experiences of other guys this deletes everything A: schreibt in die Application Partition, wenn nicht vorhanden --> überschreibt es alles, auch den bootloader / writes to application partition, if not existant it will overwrite everything, even the bootloader R: schreibt in die Ramdisk Partition, wenn nicht vorhanden --> überschreibt es alles, auch den bootloader / writes to Ramdisk partition, if not existant it will overwrite everything, even the bootloader |
Can you eventually fill in th missing explanations? EDIT: I put n the rest I know.
I would take point 5 with tftp mode when I seem to have a working firmware. I have an TFTP server installed on my machine and will see if it works. What I understood from all the post of other people the tftp way seems to be a possibility to check a firmware quite easily more or less in ram, without flashing it to flash memory at all. Is that right? Did you ever do that?
If it is interesting; I ordered an Adafruit FT232H Breakout Adapter to get the serial connection to the board. It is sad also to handle JTAG connections, but yet I did not try.
Ok, that was a lot of stuff I hope you can understand where I stand. If you have an idea of how to get a working device tree file, let me know!
Bye Hendrik
Ce message a été modifié 3 fois. Dernière modification effectuée par "hendi060" (28 mai 2021, 20:12)
I've been slack in visiting the forum lately and so didn't realise you had put up a new post.
I did look for my Mvixbox data and found several rewritable CD's with notes and trial firmwares.
Also found my test MvixBox and the RS232 tool I made to push the plug onto the port without breaking the box apart.
I will fire the thing up to get to the boot loader program - IIRC it was a tricky timing thing to get the serial connection to work (made some notes on that too!).
You are quite right in that the person that created the openwrt firmware for the MVixbox (and other NAS copies) did his own source code change management thing.
I was not versed with Linux or source code so he never shared what kernel/code changes were made.
Instead I managed to become a test bed for his Mvixbox tweaked openwrt firmwares.
Your effort and results so far are more than I accomplished.
Send me a private message with your email address so we can exchange what information we have.
 .
.I wrote a PM with my mailadress. We will see if it helps. If you could send me printouts of bootscreens to compare it would be also good.
How did you flash the firmware till now? Did you ever use TFTP?
IIRC - never select the bootloader firmware option to flash the ramdisk (you will brick it!).
That option rewrites the flash with a complete firmware that includes the redboot bootloader and FIS and other MTD sections (which I don't remember of hand!).
The only way to unbrick it then is via the JTAG port (never had to do that myself!).
sometimes I am a really dumb guy.I read your last post for sure, but did not remember it or thought about reading it the day before yesterday.... To make it short; you are right, the option R will brick the device. Unfortunately my RS232 connection was to instable to check that I have to do a ctrl c within the 2 seconds. Now it is messed up. I had compiled an openWRT for my device in the end with the dts file and the menuconfig for the makefile. I will tell you later. For now I soldered a cable to the JTAG port.I took ribbon cable, what was maybe not the best choice. I got short cuts due to fine cores connecting to each other. However I got the cable and the connector knit together. I put some pictures here. Now I am about to try a connection with OpenOCD or with the flsh tool they are talking about in this forum.
Suddenly I am way back from the target... If I want to see the good thing about it, I can try the ptched bootloader from open gemini, if Iever get this thing running again. I will come back to tell how things went.
 [/url]
 I have now a connection via OpenOCD and the Adafruit breakot Board FT232H. Now I do not reallyknowwhich kind of flash nand or nor (I think it is nor, cause it is a microcontroller). The more difficult thing is the start address for the bootloader. I would think it is GEMINI_FLASH_BASE 0x30000000, but I am not sure and do not know what I can damage when I give the wrong one. In theory the flash tool must know it...
BTW: Again thanks to this forum for all the inforation about JTAG connection and so on.
I think I will send HWguru the question about it.
EDIT1:
I tried now with the program statement from openocd to program the chip at adress 0x30000000, because that is the flash start and in the layout the bootloader is the first thing on the flash. Unfortunately openocd does not know how to reset the target chip. For that reason I cannot program the chip, the operation aborts. At that point I am stuck know. I check my material and the forum if somehow I get brewed a parallel port adapter and then use the flash tool of the hwguru.
So if someone has hints how to tell oocd how to reset the cs3516 please tell me.
EDIT2:
I talked to HWguru meanwhile and learned a lot
. Great guy, thanks so far. He helped me out with information I already should have known, like the driver for LPT port I need when I take a JTAG Wiggler device. I set up one old XP PC, put the flash tool on it, installed the LPT driver from the forum and did a connection. The flashtool told me then, that it misses the Debug short circuit and the target is not in debug mode. BTW, the tool is quite cool, I found out all the right pins with the LED test and could measure 2,6V, what HWguru said should be enough, if not I should put in another Diode in for each JTAG Input. For reasons of some headless reaction one night I tried the Wiggler thing and thought there comes to much voltage out, I bought also an FTDI 232R breadboard, which was really cheap, about 8 bucks(€). So now I also have this. However HWguru sais the real LPT is the faster way to do those things, so I will keep up with this first. That is where I stand now, I used the JTAG layout techman posted in this forum and it seems that either on my layout or on my controller something is different then it should be. EmmaC seemed to had the same thing working in here: NS-2502 FT232R Pinouts. What is whatI hope it is the layout. I will test with a 330Ohm resistance in series some of the other pins against VCC 3V3 and hopefully I find something, if not I do not know how to o further....by now.
I will come back with results however they would be.
EDIT3:
I just tested the PINs again. It seems I connected everything right and the Pinout from Techman is right. I checked the Signal DBGACK and it rises in the moment I put VCC to the dedicated DBGRQ pin. So it seems to be recogneized by the chip. Unfortunately the Flash Tool does not recogneize it. I do not know what to do now.
Ce message a été modifié 4 fois. Dernière modification effectuée par "hendi060" (19 septembre 2020, 00:20)
With the support of HWguru I have no doubt you will get the JTAG / RS232 connection sorted out.
I seem to recall saving the MTD "partitions" of my Mvixbox before I did anything.
Not sure why I did that now, but probably for potential recovery via JTAG (I never bricked any of my NAS boxes).
Hope the NAS box comes back to life again.
since last week I am back on track
 . Thanks to HWguru and his pacience we finally found out that my JTAG cable I soldered on the board was to long to function in every situation. After bringing it down to about 10cm from before 25cm everything suddenly works with the Wiggler. The flash tool recogneized the Debug mode and I could flash the bootloader then. I have to say I could not flash the original file from the board, but took the one from opengemini. The one from here was quite long and broke up two times I tried to flash it.
 BTW: The USB programmer tool I bought was useless. It was from AZ company with an AZ chip and not the needed FTDI FT232R, I got my money back.
Now I am working on the open WRT again and try to shrink it a little. It was about 15MB, obviously to large to fit in the flash. Have you eventually the commands noted somewhere, which you used to flash the MDT partition? Linus Walleij told me this side as reference. Can you confirm the code at the end of the side? To which adress do you write which binary file? I get out only one file from the open wrt build process.
Regards
Hendrik
I got some progress again. I loaded a quite big(14.5MB) initramfs image to the RAM with the option 5 of red boot and load -m tftp -b 0x100000 and executed it with go 0x100000. Now I have it running in RAM and can ssh to the root console. The next step would be to elminate errors and close unknown information issues like which led is on whic port and so on. Also there is to much stuff in that is not needed, like some drivers and so on. Also th eMUX for the drive is to test. To make it short,there is stikk some work to do.
|
|
Code source |
1 2 3 4 5 6 7 8 9 10 11 12 13 14 15 16 |
BusyBox v1.31.1 () built-in shell (ash)

  _______                     ________        __
 |       |.-----.-----.-----.|  |  |  |.----.|  |_
 |   -   ||  _  |  -__|     ||  |  |  ||   _||   _|
 |_______||   __|_____|__|__||________||__|  |____|
          |__| W I R E L E S S   F R E E D O M
 -----------------------------------------------------
 OpenWrt SNAPSHOT, r14626-2d72671b6e
 -----------------------------------------------------
=== WARNING! =====================================
There is no root password defined on this device!
Use the "passwd" command to set up a new password
in order to prevent unauthorized SSH logins.
--------------------------------------------------
root@OpenWrt:~#
|
For a long time I did think the boot was not finishing because I checked the boot sequence in the serial connection, then it suddenly did not go on. The trick is to hit ENTER
. Suddenly the open wrt screen showed up. Here is some boot extract. |
|
Code source |
1 2 3 4 5 6 7 8 9 10 11 12 13 14 15 16 17 18 19 20 21 22 23 24 25 26 27 28 29 30 31 32 33 34 35 36 37 38 39 40 |
[ 0.000000] Booting Linux on physical CPU 0x0 [ 0.000000] Linux version 5.4.68 (henne@henne-X541SA) (gcc version 8.4.0 (OpenWrt GCC 8.4.0 r14066-11ea7ba698)) #0 PREEMPT Fri Oct 2 15:08:28 2020 [ 0.000000] CPU: FA526 [66015261] revision 1 (ARMv4), cr=0000397f [ 0.000000] CPU: VIVT data cache, VIVT instruction cache [ 0.000000] OF: fdt: Machine model: myditto NAS [ 0.000000] Memory policy: Data cache writeback [ 0.000000] cma: Reserved 16 MiB at 0x07000000 [ 0.000000] Built 1 zonelists, mobility grouping on. Total pages: 32480 [ 0.000000] Kernel command line: console=ttyS0,19200n8 root=/dev/mtdblock3 rw rootfstype=squashfs,jffs2 rootwait [ 0.000000] Dentry cache hash table entries: 16384 (order: 4, 65536 bytes, linear) [ 0.000000] Inode-cache hash table entries: 8192 (order: 3, 32768 bytes, linear) [ 0.000000] mem auto-init: stack:off, heap alloc:off, heap free:off [ 0.000000] Memory: 93408K/131072K available (5267K kernel code, 197K rwdata, 1492K rodata, 12288K init, 224K bss, 21280K reserved, 16384K cma-reserved, 0K highmem) [ 0.000000] SLUB: HWalign=32, Order=0-3, MinObjects=0, CPUs=1, Nodes=1 [ 0.000000] rcu: Preemptible hierarchical RCU implementation. [ 0.000000] Tasks RCU enabled. [ 0.000000] rcu: RCU calculated value of scheduler-enlistment delay is 10 jiffies. [ 0.000000] NR_IRQS: 16, nr_irqs: 16, preallocated irqs: 16 [ 0.000000] random: get_random_bytes called from start_kernel+0x29c/0x498 with crng_init=0 [ 0.000000] clocksource: FTTMR010-TIMER2: mask: 0xffffffff max_cycles: 0xffffffff, max_idle_ns: 76450417870 ns [ 0.000028] sched_clock: 32 bits at 25MHz, resolution 40ns, wraps every 85899345900ns [ 0.000125] Switching to timer-based delay loop, resolution 40ns [ 0.000758] Console: colour dummy device 80x30 [ 0.000889] Calibrating delay loop (skipped), value calculated using timer frequency.. 50.00 BogoMIPS (lpj=250000) [ 0.000949] pid_max: default: 32768 minimum: 301 [ 0.001807] Mount-cache hash table entries: 1024 (order: 0, 4096 bytes, linear) [ 0.001897] Mountpoint-cache hash table entries: 1024 (order: 0, 4096 bytes, linear) [ 0.004941] CPU: Testing write buffer coherency: ok [ 0.008912] Setting up static identity map for 0x100000 - 0x100048 [ 0.009473] rcu: Hierarchical SRCU implementation. [ 0.022532] clocksource: jiffies: mask: 0xffffffff max_cycles: 0xffffffff, max_idle_ns: 19112604462750000 ns [ 0.022613] futex hash table entries: 256 (order: -1, 3072 bytes, linear) [ 0.026729] pinctrl core: initialized pinctrl subsystem [ 0.029982] NET: Registered protocol family 16 [ 0.040771] DMA: preallocated 256 KiB pool for atomic coherent allocations [ 0.054085] No ATAGs? [ 0.063181] pinctrl-gemini 40000000.syscon:pinctrl: detected 3516 chip variant [ 0.063260] pinctrl-gemini 40000000.syscon:pinctrl: GLOBAL MISC CTRL at boot: 0x8bc22037 [ 0.063310] pinctrl-gemini 40000000.syscon:pinctrl: flash pin is not set [ 0.064929] pinctrl-gemini 40000000.syscon:pinctrl: initialized Gemini pin control driver |
Ce message a été modifié 1 fois. Dernière modification effectuée par "hendi060" (18 novembre 2020, 21:07)
finally I got it!!!
Honestly it would have been possible to get this done faster, but in detail there is a lot of stuff you can get lost with.
In short words it is about to download Openwrt from Git, adapt the makefile for the image, do a make menuconfig, compile and that is it. But in reality there is a lot more like checking which hardware is used, which programms are necessary, how much space is availabe and so on.
I think it will take some time till I put everything here, if in the meanwhile someone has questions, also in German, I try to help.
Meanwhile I put my *.dts file here to have the main configuration. It should work also for MVIXBOX, Edimax NS2502 and Digitus DN-7024 devices I guess.
@Aquar if you still read, give me a sign, then we can try with your device.
|
|
Code source |
1 2 3 4 5 6 7 8 9 10 11 12 13 14 15 16 17 18 19 20 21 22 23 24 25 26 27 28 29 30 31 32 33 34 35 36 37 38 39 40 41 42 43 44 45 46 47 48 49 50 51 52 53 54 55 56 57 58 59 60 61 62 63 64 65 66 67 68 69 70 71 72 73 74 75 76 77 78 79 80 81 82 83 84 85 86 87 88 89 90 91 92 93 94 95 96 97 98 99 100 101 102 103 104 105 106 107 108 109 110 111 112 113 114 115 116 117 118 119 120 121 122 123 124 125 126 127 128 129 130 131 132 133 134 135 136 137 138 139 140 141 142 143 144 145 146 147 148 149 150 151 152 153 154 155 156 157 158 159 160 161 162 163 164 165 166 167 168 169 170 171 172 173 174 175 176 177 178 179 180 181 182 183 184 185 186 187 188 189 190 191 192 193 194 195 196 197 198 199 200 201 202 203 204 205 206 207 208 209 210 211 212 213 214 215 216 217 218 219 220 221 222 223 224 225 226 227 228 229 230 231 232 233 234 235 236 237 238 239 240 241 242 243 244 245 246 247 248 249 250 251 252 253 254 255 256 257 258 259 260 261 262 263 264 265 266 267 268 269 270 271 272 273 274 275 276 277 278 279 280 281 282 283 284 285 286 287 288 289 290 291 292 293 294 295 296 |
// SPDX-License-Identifier: GPL-2.0
/*
 * Device Tree file for the Gemini-based Raidsonic NAS 4220, modified for myditto NAS
 * all out commented lines are from original kernelorg file, linked to by linus walleij.
 * I put hints when I changed something
 */

/dts-v1/;

#include "gemini.dtsi"
#include <dt-bindings/input/input.h>

/ {
	model = "myditto NAS";
	compatible = "myditto,NAS", "cortina,gemini"; /*is the manufacturer and "type" of my NAS, no clue if it is ok like this and if that are keywords for anything*/
	/*compatible = "raidsonic,ib-4220-b", "cortina,gemini";*/
	#address-cells = <1>;
	#size-cells = <1>;

	memory@0 { /* 128 MB */
		device_type = "memory";
		reg = <0x000000 0x8000000>;
	};

	chosen {

/*aus Kernel Command line von opengemini --> console=ttyS0,19200n8 mem=128M root=/dev/mtdblock2 noinitrd init=/etc/preinit*/
/*		bootargs = "console=ttyS0,19200n8 root=/dev/mtdblock2 rw rootfstype=squashfs,jffs2 rootwait";*/
		bootargs = "console=ttyS0,19200n8 root=/dev/mtdblock2 rw rootfstype=squashfs,jffs2 rootwait noinitrd init=/etc/preinit";
		stdout-path = &uart0;
	};
/*aliases {
	mdio-gpio0 = <&mdio0>;
};*/

	gpio_keys {
		compatible = "gpio-keys";
		/*P1? original device function: Release - shutdown, functioncodes are standard linux, no idea if they work as expected*/
		button-setup {
			debounce-interval = <100>;
			wakeup-source;
			linux,code = <KEY_POWER>;
			/*label = "Backup button";*/
			label = "Power button";
			/* Conflict with TVC WTF is it, I got something like this is a multiplexed gpio, but why the conflict?
			 * answer: It seems to be an included display controller according to *.dtsi file, but no use in this case I guess.
			 */
			gpios = <&gpio0 1 GPIO_ACTIVE_LOW>;
		};
		/*P2? original device function: Copy Key authentication*/
		button-restart {
			debounce-interval = <100>;
			wakeup-source;
			linux,code = <KEY_RESTART>;
			label = "Softreset button";
			/* Conflict with TVC */
			gpios = <&gpio0 14 GPIO_ACTIVE_LOW>;
		};
	};
	/*GPIOs are ok, functions to be tested during longer run
	 *it seems the fan is hard wired
	 */
	leds {
		compatible = "gpio-leds";
		/*LED 1, power led*/
		led-green-power {
			label = "myditto:green:power";
			gpios = <&gpio0 7 GPIO_ACTIVE_LOW>;
			default-state = "on";
		};

		/*LED2, LAN led is directly driven from LAN port*/
		/*led-green-ethernet {
			label = "myditto:green:status";
			gpios = <&gpio0 6 GPIO_ACTIVE_LOW>;
			default-state = "on";
			linux,default-trigger = "netdev";
		};
		*/

		/*LED3, status led*/
		led-green-status {
			label = "myditto:green:status";
			gpios = <&gpio0 6 GPIO_ACTIVE_LOW>;
			default-state = "on";
			linux,default-trigger = "heartbeat";
		};

		/*LED4, usb1 led not yet parameterized*/
		led-green-usb1{
			label = "myditto:green:usb1";
			gpios = <&gpio0 4 GPIO_ACTIVE_LOW>;
			default-state = "on";
			/*linux,default-trigger = "heartbeat";*/
			/*trigger-sources = <&ohci_port1>, <&ehci_port1>;*/
		};

		/*LED5, usb2  led not yet parameterized*/
		led-green-usb2 {
			label = "myditto:green:usb2";
			gpios = <&gpio0 17 GPIO_ACTIVE_LOW>;
			default-state = "on";
			linux,default-trigger = "usb-host";
		};

		/*LED6, */
		led-green-hdd1 {
			label = "myditto:green:hdd1";
			gpios = <&gpio0 18 GPIO_ACTIVE_LOW>;
			default-state = "on";
			linux,default-trigger = "disk-activity";
		};

		/*LED7, status hdd2*/
		led-green-hdd2{
			label = "myditto:green:hdd2";
			gpios = <&gpio0 2 GPIO_ACTIVE_LOW>;
			default-state = "on";
			linux,default-trigger = "disk-activity";
		};
		/*beeper*/
		beeper-status{
			label = "myditto:beeper:status";
			gpios = <&gpio0 15 GPIO_ACTIVE_HIGH>;
			default-state = "off";
			linux,default-trigger = "panic-indicator";
		};
	};

	mdio0: ethernet-phy {
		compatible = "virtual,mdio-gpio";
		gpios = <&gpio0 22 GPIO_ACTIVE_HIGH>, /* MDC */
			<&gpio0 21 GPIO_ACTIVE_HIGH>; /* MDIO */
		#address-cells = <1>;
		#size-cells = <0>;

		phy0: ethernet-phy@1 {
			reg = <1>;
			device_type = "ethernet-phy";
		};
	};

	soc {
		flash@30000000 {
			status = "okay";
			/* 8MB of flash */
			reg = <0x30000000 0x00800000>;/*changed to 8MB, taken from kernellog opengemini firmware*/

			partition@0 {
				label = "RedBoot";
				reg = <0x00000000 0x00020000>;
				read-only;
			};
			partition@20000 {
				label = "Kernel";
				reg = <0x00020000 0x00280000>;
			};
			partition@280000 {
				label = "rootfs";
				reg = <0x002A0000 0x00480000>;
			};
			partition@720000 {
				label = "VCTL";
				reg = <0x00720000 0x00020000>;
				read-only;
			};
			partition@740000 {
				label = "CurConf";
				reg = <0x00740000 0x00020000>;
				read-only;
			};
			partition@7E0000 {
				label = "FIS directory";
				reg = <0x007E000 0x00001400>;
				read-only;
			};
/*			firmware@20000 {
				label = "firmware";
				reg = <0x00020000 0x00f00000>;
			};
			rootfs@320000 {
				label = "rootfs";
				reg = <0x00320000 0x00c00000>;
			};
*/
		}; 						/*end flash configuration*/

syscon: syscon@40000000 {
			pinctrl {
				/*
				 * gpio1dgrp cover line 28-31 otherwise used
				 * by TVC.
				 */
				gpio1_default_pins: pinctrl-gpio1 {
					mux {
						function = "gpio1";
						groups = "gpio1dgrp";
					};
				};
				pinctrl-gmii {
					mux {
						function = "gmii";
						groups = "gmii_gmac0_grp";
					};
					conf0 {
						pins = "V8 GMAC0 RXDV", "T10 GMAC1 RXDV";
						skew-delay = <0>;
					};
					conf1 {
						pins = "Y7 GMAC0 RXC", "Y11 GMAC1 RXC";
						skew-delay = <15>;
					};
					conf2 {
						pins = "T8 GMAC0 TXEN", "W11 GMAC1 TXEN";
						skew-delay = <7>;
					};
					conf3 {
						pins = "U8 GMAC0 TXC";
						skew-delay = <11>;
					};
					conf4 {
						pins = "V11 GMAC1 TXC";
						skew-delay = <10>;
					};
					conf5 {
						pins = "W8 GMAC0 RXD0", "V9 GMAC0 RXD1",
						       "Y8 GMAC0 RXD2", "U9 GMAC0 RXD3",
						       "T7 GMAC0 TXD0", "U6 GMAC0 TXD1",
						       "V7 GMAC0 TXD2", "U7 GMAC0 TXD3",
						       "Y12 GMAC1 RXD0", "V12 GMAC1 RXD1",
						       "T11 GMAC1 RXD2", "W12 GMAC1 RXD3",
						       "U10 GMAC1 TXD0", "Y10 GMAC1 TXD1",
						       "W10 GMAC1 TXD2", "T9 GMAC1 TXD3";
						skew-delay = <7>;
					};
					conf6 {
						groups = "gmii_gmac0_grp";
						drive-strength = <16>;
					};
				};
			};
		};

		sata: sata@46000000 {
			cortina,gemini-ata-muxmode = <0>;
			cortina,gemini-enable-sata-bridge;
			status = "okay";
		};

		gpio1: gpio@4e000000 {
			pinctrl-names = "default";
			pinctrl-0 = <&gpio1_default_pins>;
		};

		ethernet@60000000 {
			status = "okay";

			gmac0: ethernet-port@0 {
				phy-mode = "rgmii";
				phy-handle = <&phy0>;
				fixed-link {
					speed = <1000>;
					full-duplex;
					pause;
				};
			};
			gmac1: ethernet-port@1 {
				status = "disabled";
			};
		};

		ide@63000000 {
			status = "okay";
		};

		ide@63400000 {
			status = "okay";
		};

		ata@63000000 {
			status = "okay";
		};

		ata@63400000 {
			status = "okay";
		};

		usb@68000000 {
			status = "okay";
		};

		usb@69000000 {
			status = "okay";
		};
	};
};
|
It is not cleaned yet, but seems fully functional. The fixed link of ethernet does not work.
Ce message a été modifié 2 fois. Dernière modification effectuée par "hendi060" (1 juillet 2021, 21:00)
Download openwrt and configure the build root for a new device
triggered by Aquar and due to having a little time now I want to go in explaining how to build openwrt for the NAS device of your choice. It should be for devices where the processor is already
supported in openwrt. If you want to know about my skills... it is not to much
.I am a normal linux user with a lubuntu system which I recommend for developers without any linux knowledge(this or other ubuntu derivates).
Let us start:
The following things you have to do in the command line.
Openwrt tells you how to install build essentials like this: build system. For debian based system it is:
|
|
Code source |
1 2 3 4 5 6 |
sudo apt update sudo apt install build-essential ccache ecj fastjar file g++ gawk \ gettext git java-propose-classpath libelf-dev libncurses5-dev \ libncursesw5-dev libssl-dev python python2.7-dev python3 unzip wget \ python3-distutils python3-setuptools rsync subversion swig time \ xsltproc zlib1g-dev |
For later use I recommend binwalk. That tool is kind of amazing when you want to analyze your image for example.
|
|
Code source |
1 |
sudo apt install binwalk |
Another guide tells you how to download and compile from git to get your build root, and how to get a build system as a virtual machine if you want.
I did this:
|
|
Code source |
1 2 3 4 5 6 |
mkdir /home/userdir/openwrt_workdir cd /home/userdir/openwrt_workdir git clone https://git.openwrt.org/openwrt/openwrt.git cd openwrt git tag git checkout v19.07.7 |
The actual tag is the "view" on the wanted tag,as far as I understand you set some kind of pointer to it, by using the tag command you will see a lot more possibilities.
After that is done you have the local copy of the repository and now can do a configuration of the build system:
|
|
Code source |
1 2 3 4 5 6 7 8 9 10 11 12 13 14 15 16 17 18 19 20 21 22 23 24 25 26 27 28 29 30 31 32 33 34 35 36 37 |
less README

  _______                     ________        __
 |       |.-----.-----.-----.|  |  |  |.----.|  |_
 |   -   ||  _  |  -__|     ||  |  |  ||   _||   _|
 |_______||   __|_____|__|__||________||__|  |____|
          |__| W I R E L E S S   F R E E D O M
 -----------------------------------------------------

This is the buildsystem for the OpenWrt Linux distribution.

To build your own firmware you need a Linux, BSD or MacOSX system (case
sensitive filesystem required). Cygwin is unsupported because of the lack
of a case sensitive file system.

You need gcc, binutils, bzip2, flex, python, perl, make, find, grep, diff,
unzip, gawk, getopt, subversion, libz-dev and libc headers installed.

1. Run "./scripts/feeds update -a" to obtain all the latest package definitions
defined in feeds.conf / feeds.conf.default

2. Run "./scripts/feeds install -a" to install symlinks for all obtained
packages into package/feeds/

3. Run "make menuconfig" to select your preferred configuration for the
toolchain, target system & firmware packages.

4. Run "make" to build your firmware. This will download all sources, build
the cross-compile toolchain and then cross-compile the Linux kernel & all
chosen applications for your target system.

Sunshine!
        Your OpenWrt Community
        http://www.openwrt.org


README (END)
|
let s do it
|
|
Code source |
1 2 |
./scripts/feeds update -a ./scripts/feeds install -a |
To add a new device you have to do two things:
Create a device tree file that fits your needs. To explain that will be out of bounds of this guide, but for explanation, that file is the explanation of your hardware to the linux kernel. I explain later the
for me important things to edit in the *.dts file. I posted my actual one, one post before. Put that file after the first buildrun and after openwrt complains about the missing file, in the folder $BUILDROOT/build_dir/target-arm_fa526_musl_eabi/linux-gemini/linux-4.14.222/arch/arm/boot/dts/
were you have to exchange the linux architecture versionnumber against the one you use.

Then you have to edit the Makefile in ./openwrt/target/linux/gemini/image/. The codename for the chip was gemini, that is why this name is used all across the building environment. In that Makefile all the gemini
devices are listed and it is written how the firmware should be build. Honestly I did not understand every possibility inside of the Makefile and would keep it simple. There are firmware with special headers,
were the bootloader will not accept a piece of software without it, that all is managed in here. So you take all the pieces of built linux software(operating system, or kernel) and packages needed inside of the filesystem and fix ho to combine that stuff.
The image partitions, I mean kernel part and file system part, has to be aligned to the bootloader and/or the information of the *.dts file. Important is that the information in the *.dts file for partitions is some
kind of virtual, but the one openwrt looks for. The bootloader sees its one firmware file, no matter what. So with my knowledge I understood openwrt looks everywhere on the flash you point it to. The bootloader only knows
the fixed partitions iniside its environment, how should it look beyond... .
It seems that the build takes the generated files from .openwrt/build_dir/target-arm_fa526_musl_eabi/linux-gemini/. After processing the result is written to ./openwrt/bin/targets/gemini/generic/.
I put that in for my device:

Code source
1
2
3
4
5
6
7
8
9
10
11
12
13
14
15
16
17
18
19
20
21
22
23
#Default Layout Danelec myditto:
#Name              		FLASH addr           		Mem addr    Datalen     Entry point
#BOOT              		0x30000000-3001FFFF  0x00000000  0x00020000  0x00000000  	MTD0
#FIS directory     	0x307E0000-307FFFFF  0x307E0000  0x00001400  0x00000000		MTD4
#Kern              		0x30020000-3071FFFF  0x00800000  0x00700000  0x00800014		MTD1
#CurConf           	0x30740000-3075FFFF  0x00000000  0x00020000  0x00000000		MTD3
#VCTL             		0x30720000-3073FFFF  0x00000000  0x00020000  0x00000000		MTD2


define Device/myditto_NAS
	DEVICE_TITLE := Danelec Myditto NAS
	DEVICE_DTS := gemini-nas-myditto
	DEVICE_TYPE := nas
	DEVICE_PACKAGES := $(GEMINI_NAS_PACKAGES)
	IMAGE_SIZE := 7168k
	BLOCKSIZE := 64k
	KERNEL_SIZE := 2560k
	DEVICE_VENDOR := Dane Elec
	DEVICE_MODEL := MD-H10000E23E
	IMAGES := factory.bin
	IMAGE/factory.bin := append-kernel | pad-to $$$$(KERNEL_SIZE) | append-rootfs|pad-to $$$$(IMAGE_SIZE)
 endef
TARGET_DEVICES += myditto_NAS
Honestly I did not flash the result of that file, but dd'ed some files together from linux-gemini.
Code source
1
2
3
 dd if=/dev/zero bs=7340032 count=1 | tr '\0' '\377' > ./tmp/image_myditto
 dd if=myditto_NAS-kernel.bin of=./tmp/image_myditto conv=notrunc
 dd if=root.squashfs bs=1024 seek=2560 of=./tmp/image_myditto conv=notrunc
Binwalk says it should be the same, but I did not yet try:
Code source
1
2
3
4
5
6
7
8
9
10
11
DECIMAL       HEXADECIMAL     DESCRIPTION
--------------------------------------------------------------------------------
36            	0x24            Linux kernel ARM boot executable zImage (little-endian), load address: "0x00000000", end address: "0x00207B98"
8400         	0x20D0          LZMA compressed data, properties: 0x6D, dictionary size: 1048576 bytes, uncompressed size: -1 bytes
2621440     0x280000        Squashfs filesystem, little endian, version 4.0, compression:xz, size: 4210642 bytes, 1307 inodes, blocksize: 65536 bytes, created: 2021-03-01 21:33:20
Here you can also see the flash layout. The kernel is in the first 2 parts, the partition is extended(padded) to 2560kB, I choose that to have a little space for the next kernel, to not touch the *.dts file again. Meanwhile I think that will not really be enough... .
In the 3rd part is the filesystem included all the packages stuff, but the squashfs part is only readable. The file system part is padded that way, that a full 7MB image file is generated. The gap between
the squashfs part and the end of the 7MB are free space that openwrt recogneizes at the first boot from flash. It then creates a JFFS2 part from the free space. This is the part where
the overlay saves changed files or new packages(I did not install opkg).
I also put in the layout as a visual help for me. Everything with double cross in the beginning are comments. The last line is the important one to let the device show up in the make menuconfig. Very important for me was to "touch" the file:
Code source
1
touch Makefile
Openwrt also describes that and it took me a lot of time to recogneize why the menu entry did not appear... . https://openwrt.org/docs/guide-developer/add.new.device
Ce message a été modifié 3 fois. Dernière modification effectuée par "hendi060" (5 juillet 2021, 00:33)
Make the target firmware
So let's go on with the firmware.
After that is done you can take my diffconfig, what is the difference between original .config and my changes in openwrt, and replace the .config file with it. Or just copy all the code, remove
everything inside of the .config and put that information in here. The .config file is in the root directory ./openwrt/.... and in Linux a hidden file.
|
|
Code source |
1 2 3 4 5 6 7 8 9 10 11 12 13 14 15 16 17 18 19 20 21 22 23 24 25 26 27 28 29 30 31 32 33 34 35 36 37 38 39 40 41 42 43 44 45 46 47 48 49 50 51 52 53 54 55 56 57 58 59 60 61 62 63 64 65 66 67 68 69 70 71 72 73 74 75 76 77 78 79 80 81 82 83 84 85 86 87 88 89 90 91 92 93 94 95 96 97 98 99 100 101 102 103 104 105 106 107 108 109 110 111 112 |
CONFIG_TARGET_gemini=y CONFIG_TARGET_gemini_DEVICE_myditto_NAS=y CONFIG_TARGET_BOARD="gemini" CONFIG_BUSYBOX_CUSTOM=y # CONFIG_BUSYBOX_CONFIG_FEATURE_IPV6 is not set # CONFIG_BUSYBOX_CONFIG_INCLUDE_SUSv2 is not set # CONFIG_BUSYBOX_DEFAULT_FEATURE_IPV6 is not set # CONFIG_IPV6 is not set # CONFIG_KERNEL_IPV6 is not set CONFIG_PACKAGE_block-mount=y CONFIG_PACKAGE_blockd=y CONFIG_PACKAGE_cgi-io=y # CONFIG_PACKAGE_dnsmasq is not set CONFIG_PACKAGE_fconfig=y # CONFIG_PACKAGE_firewall is not set CONFIG_PACKAGE_hd-idle=y # CONFIG_PACKAGE_iptables is not set CONFIG_PACKAGE_kmod-fs-autofs4=y # CONFIG_PACKAGE_kmod-fs-btrfs is not set CONFIG_PACKAGE_kmod-fs-ext4=y # CONFIG_PACKAGE_kmod-fs-nfs is not set # CONFIG_PACKAGE_kmod-fs-ntfs is not set # CONFIG_PACKAGE_kmod-fs-reiserfs is not set CONFIG_PACKAGE_kmod-fs-squashfs=y CONFIG_PACKAGE_kmod-gpio-beeper=y CONFIG_PACKAGE_kmod-gpio-dev=y CONFIG_PACKAGE_kmod-input-core=y # CONFIG_PACKAGE_kmod-ipt-conntrack is not set # CONFIG_PACKAGE_kmod-ipt-core is not set # CONFIG_PACKAGE_kmod-ipt-nat is not set # CONFIG_PACKAGE_kmod-ipt-offload is not set CONFIG_PACKAGE_kmod-ledtrig-default-on=y CONFIG_PACKAGE_kmod-ledtrig-gpio=y CONFIG_PACKAGE_kmod-ledtrig-netdev=y CONFIG_PACKAGE_kmod-ledtrig-oneshot=y # CONFIG_PACKAGE_kmod-lib-crc-ccitt is not set CONFIG_PACKAGE_kmod-lib-crc16=y # CONFIG_PACKAGE_kmod-lib-crc32c is not set CONFIG_PACKAGE_kmod-loop=y # CONFIG_PACKAGE_kmod-md-mod is not set CONFIG_PACKAGE_kmod-mtd-rw=y CONFIG_PACKAGE_kmod-mtdoops=y CONFIG_PACKAGE_kmod-mtdram=y # CONFIG_PACKAGE_kmod-nf-conntrack is not set # CONFIG_PACKAGE_kmod-nf-flow is not set # CONFIG_PACKAGE_kmod-nf-ipt is not set # CONFIG_PACKAGE_kmod-nf-ipt6 is not set # CONFIG_PACKAGE_kmod-nf-nat is not set # CONFIG_PACKAGE_kmod-nf-reject is not set # CONFIG_PACKAGE_kmod-ppp is not set CONFIG_PACKAGE_kmod-usb-ehci=y # CONFIG_PACKAGE_kmod-usb-storage-extras is not set CONFIG_PACKAGE_kmod-usb2=y CONFIG_PACKAGE_libgpiod=y # CONFIG_PACKAGE_libip4tc is not set # CONFIG_PACKAGE_libip6tc is not set CONFIG_PACKAGE_libiwinfo=y CONFIG_PACKAGE_libiwinfo-lua=y CONFIG_PACKAGE_liblua=y CONFIG_PACKAGE_liblucihttp=y CONFIG_PACKAGE_liblucihttp-lua=y CONFIG_PACKAGE_libpopt=y CONFIG_PACKAGE_libreadline=y CONFIG_PACKAGE_libsysfs=y CONFIG_PACKAGE_libubus-lua=y CONFIG_PACKAGE_libugpio=y # CONFIG_PACKAGE_libxtables is not set CONFIG_PACKAGE_lua=y CONFIG_PACKAGE_luci-app-hd-idle=y CONFIG_PACKAGE_luci-app-samba=y CONFIG_PACKAGE_luci-base=y CONFIG_PACKAGE_luci-compat=y CONFIG_PACKAGE_luci-lib-ip=y CONFIG_PACKAGE_luci-lib-jsonc=y CONFIG_PACKAGE_luci-lib-nixio=y CONFIG_PACKAGE_luci-mod-status=y CONFIG_PACKAGE_luci-mod-system=y CONFIG_PACKAGE_luci-theme-bootstrap=y # CONFIG_PACKAGE_mdadm is not set # CONFIG_PACKAGE_mtd is not set CONFIG_PACKAGE_nano=y # CONFIG_PACKAGE_openwrt-keyring is not set # CONFIG_PACKAGE_opkg is not set # CONFIG_PACKAGE_ppp is not set CONFIG_PACKAGE_rpcd=y CONFIG_PACKAGE_rpcd-mod-file=y CONFIG_PACKAGE_rpcd-mod-iwinfo=y CONFIG_PACKAGE_rpcd-mod-luci=y CONFIG_PACKAGE_rsync=y CONFIG_PACKAGE_rsyncd=y CONFIG_PACKAGE_samba36-hotplug=y CONFIG_PACKAGE_samba36-net=y CONFIG_PACKAGE_sysfsutils=y # CONFIG_PACKAGE_uclient-fetch is not set CONFIG_PACKAGE_uhttpd=y CONFIG_PACKAGE_uhttpd-mod-ubus=y CONFIG_PACKAGE_zlib=y # CONFIG_PKG_CHECK_FORMAT_SECURITY is not set CONFIG_RSYNC_zlib=y # CONFIG_SIGNATURE_CHECK is not set # CONFIG_SIGNED_PACKAGES is not set CONFIG_TARGET_INITRAMFS_COMPRESSION_NONE=y CONFIG_TARGET_KERNEL_PARTSIZE=2 # CONFIG_TARGET_ROOTFS_EXT4FS is not set CONFIG_TARGET_ROOTFS_INITRAMFS=y CONFIG_TARGET_ROOTFS_PARTSIZE=5 CONFIG_TARGET_SQUASHFS_BLOCK_SIZE=64 CONFIG_PACKAGE_kmod-dnsresolver=y CONFIG_PACKAGE_kmod-scsi-core=y CONFIG_PACKAGE_kmod-usb-storage=y CONFIG_PACKAGE_libuclient=y CONFIG_PACKAGE_usign=y |
To get a full .config that the make process of openwrt can work with we need to expand it like this:
|
|
Code source |
1 |
make defconfig |
After that you can check the configuration again and make the firmware. That is it :-0.
|
|
Code source |
1 2 3 |
make menuconfig //choose the software you need, for NAS with low flash space I recommend my config make download//loads all packages before compiling make -j1 v=s //verbose mode with one thread, use for debugging, in the beginning use at least 4 threads to go forward, I recommend the verbose mode |
Ce message a été modifié 3 fois. Dernière modification effectuée par "hendi060" (7 juillet 2021, 07:55)
Hopefully of some use to others that are still using these now ancient NAS boxes.
Mine are still in use with one on OpenWRT as compiled by the author of the OpenGemini blog and the other on Mvix firmware.
Both working very nicely and with different feature sets.
I found this topic very interesting for me, because I received myDitto device from my colleague and I want to use it.
I am regular user of OpenWRT devices, but so far I didn't compile firmwares for myself.
I am wondering if hendi060 or AQUAR can publish compiled version of firmware for myDitto with OpenWrt?
Best regards
Greg
in general I have no problem with giving you the image, but at the moment I have a problem with the ethernet. After a while of communicating with samba or running the device it is not reachable. I have to somehow debug it, but that takes time. So my euphoriia from the beginning is slightly gone
. To make it short it is not useable at the moment. Have you got any firmware installed at the moment?
Regards
Hendrik
- 1
- 2
Discussions similaires
-
- Software / Hardware »
-
 Is the Edimax NS-2502 a reincarnation of the myDitto?
(31 mai 2018, 01:57)
Is the Edimax NS-2502 a reincarnation of the myDitto?
(31 mai 2018, 01:57)
-
- OpenWRT port for MvixBOX and Clones »
-
Installing the 2 drives in mirror RAID 1
(6 avril 2012, 17:40)
-
- Software / Hardware »
-
Opengemini
(12 juillet 2011, 04:06)
-
- Software-Development »
-
Update für Gentoo Build Environment
(10 février 2008, 16:18)